Authentication and API keys
Every API request carries a Flero API key in the x-api-key header. A key acts as the person who created it, limited by the scopes chosen for it.
Create a key
- Go to Settings → Credentials.
- In the API Keys card, click Generate API Key.
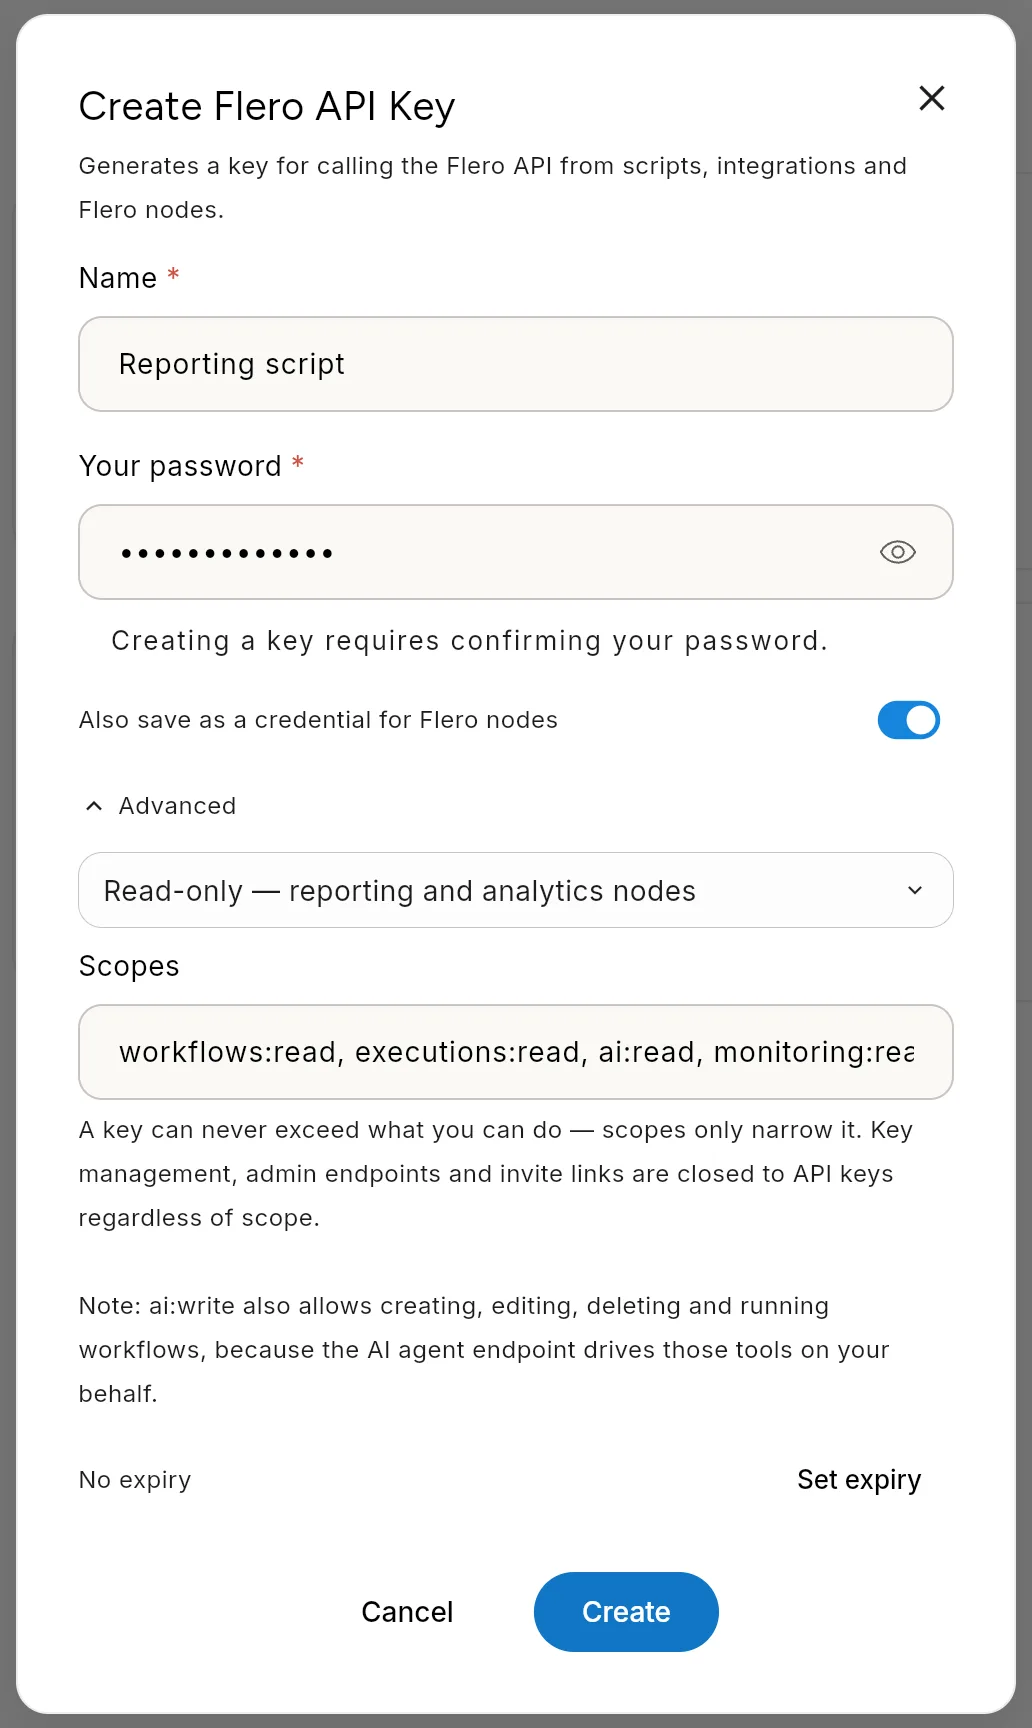
- Fill in the dialog:
- Name: what the key is for, for example "CI deploy hook".
- Your password: required. Flero asks you to confirm it is you before it creates a key.
- Also save as a credential for Flero nodes: on by default. Leave it on if Flero nodes in your workflows will call the API with this key.
- Optional: open Advanced to choose scopes and an expiry date. See below.
- Click Create.
- Copy the key from the Copy your API key dialog and store it somewhere safe.
The key is shown once. Flero keeps only a hash of it. If you lose it, revoke it and create a new one.
Keys start with dk_.
Use a key
Send the key in the x-api-key header on every request:
curl "https://<your-flero-address>/api/workspaces" \
  -H "x-api-key: dk_..."
Do not send it as Authorization: Bearer. That header is for signed-in browser sessions.
Access presets and scopes
Under Advanced, pick a preset or type your own scopes. If you leave Advanced closed, the key is Read-only.
| Preset | Shown in the key list as | Allows |
|---|---|---|
| Read-only | Read-only | Reading workflows, executions, monitoring, AI usage, credentials (names and types only), workspace members and the audit log |
| Read + write | Read + write | Everything in Read-only, plus changing workflows and folders, workspace members and variables, and stopping and rerunning executions |
| Read + write + AI agent | Read + write + AI agent | Everything above, plus the AI endpoints. This implies full control of workflows. |
| Everything the key owner can do | Full access | Every endpoint a key may use, up to the owner's own permissions |
Any other combination shows as Custom.
How scopes work
A scope has the form resource:action.
- Resource is the first part of the path after
/api/. For/api/workflows/{id}/executeit isworkflows. Sub-paths belong to their parent, so one scope covers a whole area. - Action is
readforGETrequests andwritefor everything else (POST,PUT,PATCH,DELETE). - Wildcards work:
workflows:*allows reading and writing workflows.*:readallows reading everything.*allows everything. - A key with no scopes can do nothing.
Common scopes:
| To… | Grant |
|---|---|
| Run a workflow | workflows:write |
| Read runs and their output | executions:read |
| Stop or rerun a run | executions:write |
| List and answer approvals | approvals:read, approvals:write |
| Find workspace IDs | workspaces:read |
Scopes to grant with care
| Scope | Why |
|---|---|
ai:write |
The AI endpoint can create, edit, delete and run workflows on your behalf. Treat it as full workflow control. |
executions:read |
Run output often contains personal data and tokens returned by the services your workflows call. |
credentials:read |
Returns credential names, types and metadata. Secret values are never returned. |
What a key can never do
A key never exceeds what its owner can do. Scopes only narrow it. If the owner loses access to a workspace, the key loses it too.
Some areas are closed to API keys whatever their scopes. They need a signed-in session:
- Creating, listing or revoking API keys, and other account sign-in actions
- Changing your password or managing your sessions
- Instance administration and system settings
- Workspace invite links and organisation membership
The audit log is the one exception in the account area. A key with read access can read it.
Expiry
Under Advanced, click Set expiry to pick a date. After that date the key stops working. Leave it unset for a key that does not expire.
Set an expiry on keys used by short-lived projects or shared tooling.
Revoke a key
- Go to Settings → Credentials.
- In API Keys, find the key. The list shows its Name, Access, Created and Last Used dates.
- Click Revoke at the end of the row, then confirm.
Revoking cannot be undone. Anything still using the key stops working at once: scripts, integrations and any Flero node credential that holds it. Requests with a revoked key fail with 401 Unauthorized.
Revoked and expired keys stay in the list, marked Revoked or Expired.
Tips
- One key per integration. Name each key after the system that uses it. You can then revoke one without breaking the others, and Last Used tells you which are still in use.
- Start narrow. Begin with Read-only or a custom list. A refused request names the scope it needed, so widening a key is quick.
- Never put a key in a node field or an expression. Store it as a credential and select it in the node.
Related
Found something out of date? This page lives in the Flero docs content set.